

Look for a switch located on or near your furnace. Location of the switch varies, so check the sides, rear or even in the rafters if the switch is not immediately visible. The switch will look like a standard light switch and should be flipped to the “off” position.
If you are unable to reach your furnace or air handler, or if you were unable to find the power switch, go to the main fuse box or circuit breaker and open the panel door. Inside, there will be several circuit breakers that should be labeled with the locations that each breaker feeds. Turn off the breaker for your HVAC equipment. If the breakers are not labeled, you may need to test each breaker to identify the corresponding areas of your home.
In either case, we suggest you verify that power has been turned off before proceeding with installation of your thermostat.

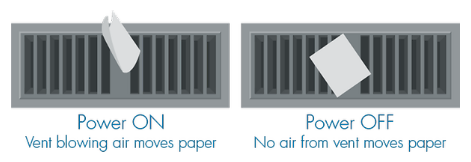
On your existing thermostat, set the fan option to “ON”, then hold your hand over a vent. You should not feel air blowing from the vent. If you’re unsure if air is blowing, you can simply place a piece of paper over the vent register and see if the paper blows around.
In either case, if air is blowing from the vent, the equipment was not turned off properly. Please verify that the furnace switch is in the off position or that the correct breaker was switch off before proceeding.
*Your furnace is Electric if:
-You do not receive a natural gas bill from a utility company or,
-You have a propane tank
*Your furnace is Gas if:
-You see a black iron pipe running to the furnace or,
-You see a flame during heating
*You have a Boiler if:
-You have radiators, baseboard heaters or radiant tubing throughout your home
-You do not have vents connected to ductwork in your house
To get started, open the Vine app on your smart device and follow the prompts to create an account.
A. Smart Device: Android or iOS
B. Vine Mobile App: Free to download from Google Play and the Apple App Store
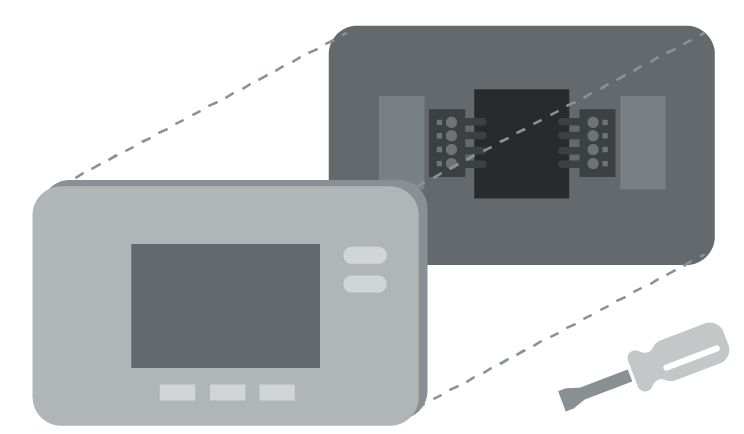
C. Medium-Tipped Phillips screwdriver
D. Your Wi-Fi network name and password
E. Wire-Cutter (Optional)
F. Pencil (Optional)
To begin, pull the labeled wires from the wall through the center opening on the Vine base.
Next, use the provided screws and anchors to secure the thermostat base to the wall. We designed the Vine thermostat to cover most holes created by old thermostats, without having to patch walls.
Remember to use the bubble level to ensure your new thermostat is straight. To do so, simply confirm that the bubble is centered before tightening the screws and securing the thermostat base to the wall.
To remove your existing thermostat from its base, consult your original thermostat’s user manual. Most thermostats can be removed from their base by gently pulling them away from the wall. You should not pull hard enough to remove the base from the wall. If the cover does not easily detach from the base there may be a screw to remove or a button or latch to release.
Once the thermostat is removed, the thermostat base should remain fixed to the wall, with wires coming from inside the wall and attaching to the terminals. Remember, not all terminals will have a wire attached.
If you cannot see the wires coming from the wall and attaching to the terminals, you likely have an additional plate that must be removed with a screwdriver. Once the additional plate has been removed, you should see the wires coming through the wall and attaching to the terminals.
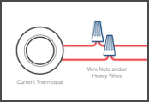
CAUTION - If you see heavy wires, wire knots or a 120 VAC label – Stop! Unfortunately, the Vine Smart Thermostat will not work on lines at this voltage. We suggest you re-attach the base and the thermostat and contact a trusted heating and cooling contractor for assistance.
If necessary, this is a good time to do any repairs or painting to the spots on your wall that will not be covered by the Vine thermostat.
To begin, pull the labeled wires from the wall through the center opening on the Vine base.
Next, use the provided screws and anchors to secure the thermostat base to the wall. We designed the Vine thermostat to cover most holes created by old thermostats, without having to patch walls.
You can use the bubble level to ensure your new thermostat is straight. To do so, simply confirm that the bubble is centered before tightening the screws and securing the thermostat base to the wall.
Many conventional, non-connected thermostats don’t need a “c-wire” to function. But today, most Wi-Fi thermostats have new features such as Wi-Fi radios and LED color screens that require the unit be powered at all times. Thermostats can get this constant power through a common wire or “c-wire.”
It is easy to see if you already have a c-wire connected to your system. Simply remove your current thermostat face from its baseplate and look for the terminal labeled with the letter “c.” If this terminal has a wire attached to it, you have an active “c-wire.”
Sometimes there will be extra, unused wires in the wall. If they are not used in wiring your Vine, simply tape them off and push them into the wall and out of the way. If you need to install a c-wire, learn more about how you can use your extra wire as a c-wire.
If you need a c-wire, there are a few main options:
Using an extra, unused wire as a c-wire
Using your thermostat’s g-wire (fan wire) as a c-wire
Installing an Add-a-Wire Kit (These kits can be purchased from another manufacturer and used with Vine.)
If you have a 2-wire, heat-only system, you could also install a 24VAC power transformer to supply constant power to your Vine thermostat.
The Vine Touch Smart Thermostat always requires a c-wire.
If you have a heat-only system connected to your Vine thermostat, an easy option for adding a common, or c-wire, is to install a 24 VAC wall plug-in transformer. Transformers with 150-400mA output are the most widely available online and easily provide sufficient power for the thermostat. Please note the wires from the wall plug-in transformer will be visible unless installed behind the wall.
If you purchase a transformer that is used to charge or power electronic devices, you will need to cut off the accessory plug (located at the end of the cord, opposite of the outlet plug) and split the two wires apart. Strip the cord around the two wires to expose a small amount of the copper wiring inside, which will be inserted into terminals on the Vine thermostat base.
Insert one wire into the unused “R” terminal on the thermostat (RC or RH) and the other wire into the “C” terminal. Make sure to cut the red RC/RH jumper on the back of the Vine face plate. Finally, plug the adapter into a nearby wall outlet.
Note: Wire colors from the system may vary.


Thick wires indicate high voltage systems that are not compatibile with Vine thermostats.
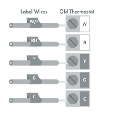
When you’re ready, mark each existing wire using the provided wire label stickers. Simply peel off the corresponding sticker from the backing and fold it around the wire – creating a small flag.
We suggest you detach and label one wire at a time. Don’t worry if it seems your wire labels don’t match – carefully follow the in-app instructions to ensure proper labeling.
Finally, make sure wires are secure and do not fall back into the wall when the final wire is removed from your old thermostat base.
To begin, look at the wires attached to your old thermostat base. Each wire should have a corresponding letter on the base. On your Vine app, select each letter that corresponds to a connected wire on your old thermostat until all of your wires are highlighted.
As you select your existing wires, nonessential wires will become disabled the on screen, narrowing down the possible combinations as you proceed.
If you accidentally select the wrong wire, simply tap it again to cancel that selection.
When you are finished, you should receive an on-screen notification that you’ve entered a compatible configuration. If you do not see this message, take a moment to verify that you have selected each wire correctly.
Receiving a "Configuration is Invalid" error message may mean that Vine thermostats may not be compatible with your current wiring. Find out how to troubleshoot this issue.
To install a Vine Touch Smart Thermostat, you’ll need an Apple (iOS) or Android mobile device and the free Vine app. You may also need your Wi-Fi network name and password. Please note – you must have a 2.4 GHz band Wi-Fi network. Whether you have a single-band or dual-band router, Vine thermostats are compatible with most residential routers. Check out a list of known Vine-incompatible routers.
Once you have the Vine app installed on your mobile device, follow the in-app step-by-step instructions to remove your old thermostat, install your new Vine thermostat, and connect your Vine thermostat to your Wi-Fi network.
Connecting your Vine thermostats to your Wi-Fi network with the Vine App
Follow the step-by-step instructions in the Vine app. The Wi-Fi connection process will be slightly different based on your device operating system (iOS/Android) and Vine app version. In many cases, the code you need to connect your Vine thermostat to your Wi-Fi network will appear dynamically on the thermostat screen.
If you want to use the thermostat remotely through the Vine app, you will need a dedicated Wi-Fi network at the residence to connect and register it.
The only way to register your Vine thermostat is through the Vine app installation process. Once you’ve connected and registered the thermostat to your account, you will then be able to operate it through the Vine app. However, you can always operate the thermostat from the wall unit, and that does not require Wi-Fi.
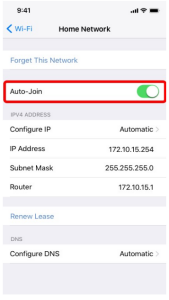
Vine is only compatible with 2.4GHz Wi-Fi networks. Most likely, your phone is currently connected to a 5GHz Wi-Fi network. Here’s how to check:
On your phone, go to Settings, and then Wi-Fi. You should see a list of your available networks, including a network that your phone is currently connected to. If you’ve never changed your network name/SSID when you setup your router, these could be default network names.
If you have a dual band router, you will have two networks broadcasting: a 2.4GHz network and a 5GHz network. You may be able distinguish your 5GHz network by “5G” at the end.
Example: Netgear 1200_5G
You need to make sure that you disconnect your 5GHz network from your phone during Vine setup. You can connect back to your 5GHz network after you connect Vine to Wi-Fi.
If you have an “Auto Join” feature, make sure to turn that off for the 5GHz network too.
Tap the “i” icon on the 5GHz network, and toggle “Auto Join” off.

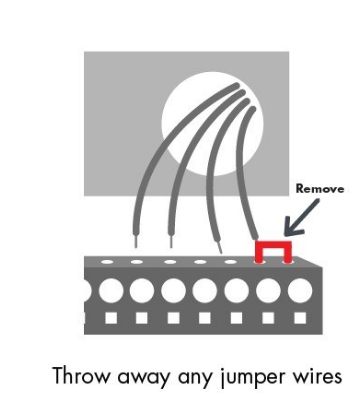
A thermostat jumper wire is a short piece of wire connecting two terminals on the thermostat base. A jumper wire does not originate from behind the wall, but is unique to each thermostat. Vine thermostat does not use jumper wires. If you have a jumper wire on your old thermostat, discard it and input only the wires from the wall into the Vine app when prompted during installation.
The jumper wire connecting terminals RC and RH are most common, and this jumper wire is not necessary on Vine thermostat. Vine thermostat has a built-in RC/RH jumper wire on the back of the thermostat face plate.
Clip the RC/RH jumper wire on the Vine thermostat if you have two separate wires (one running to RH and the other to RC) on your old thermostat that are coming from the wall. This indicates you have a two-transformer system.
If you accidentally clipped the RC/RH jumper on the back of the Vine thermostat and did not mean to, you will need to re-jumper those two terminals.
To create a new jumper for RC/RH, use a short piece of thermostat wire, strip the insulation off both ends of the wire and bend it in half. Connect one end to RC and the other end to RH on the wall plate. Leave the wire that comes out of the wall attached to either RC or RH.
Take a photo of the existing wiring attachment location for reference later in case you need it.
No, there is no standard for wiring color codes. Please refer to our Installation manual.
Use the included screws and anchors to mount the new wall plate. Be sure to check for alignment after mounting the wall plate


