
Vine thermostat has a feature called Auto Mode, which allows the thermostat to switch from Heat to Cool, or Cool to Heat automatically. Auto Mode can only be enabled from the Vine app.
From the main screen of the app, tap the Mode icon in the lower left corner. All available options will be displayed.
Select “Auto” to allow the thermostat to switch between heating and cooling based on room temperature and the selected heating and cooling set points.
When Auto Mode is selected two set points will appear on the main screen of the Vine app or thermostat. The top set point is the cooling temperature. The bottom set point is the heating temperature.
Heating and cooling set points can be changed by tapping the set point you would like to adjust. The set point selected will be highlighted white. Use the “Up” and “Down” arrows to change the highlighted set point.
For example, in Auto Mode, you can select a heating temperature and a cooling temperature such as
Cooling 78°F
Heating 70°F
With these settings, the heat will come on to maintain a minimum of 70°F if the room temperature drops to the heat setting. Cooling will come on if the room temperature rises to the cool setting of 78°F. If the indoor temperature is between 70°F and 78°F, no heat or cool will run.
Your Vine thermostat will always maintain a minimum separation of two degrees between the heat and cool set points to prevent heating and cooling from running at the same time. Using this example, if the heating set point is adjusted above 76°F, the cooling set point will also increase to prevent the temperatures from overlapping. Similarly, if adjusting the cooling set point below 68°F, the heating set point will also decrease to prevent the temperatures from overlapping.
Closer heating and cooling settings will maintain tighter temperature control and use more energy. Set points further apart will result in a wider temperature range and use less energy.
Aux (Auxiliary) Heat/Emer Heat mode is available only for heat pump equipment. Aux Heat mode means that heating is generated by a secondary (i.e. auxiliary) heat source rather than by the heat pump.
A. Smart Device: Android or iOS
B. Vine Mobile App: Free to download from Google Play and the Apple App Store
C. Medium-Tipped Phillips screwdriver
D. Your Wi-Fi network name and password
E. Wire-Cutter (Optional)
F. Pencil (Optional)
It’s important that your Vine thermostat is configured to match your system type. If not, then it may not operate your system as expected. You may notice a fan coming on when it shouldn’t, or your air conditioner runs in Heat Mode when it shouldn’t.
You may also find it unable to switch to Heat Mode or Cool Mode using your thermostat or in the Vine app. The thermostat’s configuration may have accidentally been changed. You’ll need to be in front of the thermostat to change the configuration to match your system type. Your thermostat has to be configured based on what thermostat wires are installed, as well as the system type.
See below for instructions for Vine model.
At the thermostat, tap Menu.
Press “Set Up Advanced Setting.”
Select "Heat Type"
Outdoor equipment.
If you have a heat pump, tap “Heat Pump”.
If you have an electric furnace, tap "Electric.”
If you have an gas/oil furnace, tap "Gas/Oil.”
If you have only air conditioner, tap "No heating.”
If you have Heat Pump and Conventional system, tap "Dual Fuel”
Select 0, 1, 2 on Stage setting screen.
Reversing valve position. This setting is important if you have a heat pump. Leave the default setting to “o.” If you have a heat pump, and you notice that your system is cooling in Heat Mode, and heating in Cool Mode, change from the default setting to “b”.
Tap Save.
If you’ve just installed the Vine thermostat and now your cooling does not work as expected, proceed through the following steps until the issue is resolved.
Make sure your HVAC equipment power switch is turned on.
Most cooling equipment has a power switch, on or near the furnace or air handler that looks like a light switch. Make sure it is turned on.
Make sure the furnace door or air handler panel is in proper position.
A loose or improperly installed blower compartment door or furnace panel can keep the equipment from operating. Make sure it’s squarely in place so it will engage the safety switch inside the cabinet.
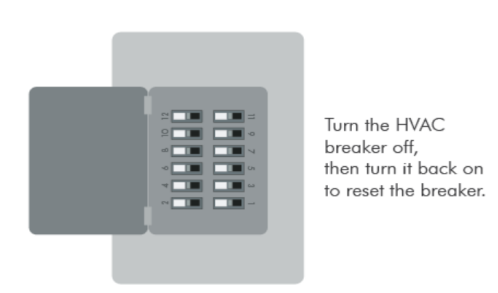
Reset your breaker.
At the main home electrical panel, turn the HVAC equipment breaker off, then turn it back on to reset the breaker.
Test Operation
If your cooling system still does not turn on, follow the steps below to determine if the issue is related to the thermostat.
Working directly on the thermostat – not through the Vine app — set the thermostat to the Cool Mode.
Lower the set point a few degrees below the room temperature.
After 10 seconds, raise the set point above the room temperature by a few degrees.
The thermostat should make a soft clicking sound and mode icon will be changed to with green dot. If this happens, skip the thermostat reset detailed below in step 5.
If the thermostat does NOT click then you should reset the thermostat.
Slightly pull on both sides of the thermostat to remove the face plate from the wall.
After 30 seconds, push the face plate back onto the sub-base. You should hear the face plate snap in place on the sub-base connected to the wall.
Repeat steps 1-4 above after the thermostat has reset.
If the thermostat still does NOT click and “Heating” does not appear on the screen, replace the thermostat.
Tighten the wire connections.
Pull the thermostat off the sub-base and check to make sure the wires are firmly connected to the thermostat terminals.
Pull on each wire. None of them should come out when you tug on them.
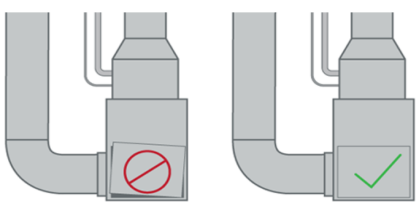
Be sure that the thermostat fits securely to the sub-base. If thermostat wiring protrudes too far past the sub-base, or if you did not use the wall screws that were provided, this can prevent your system from turning on.
Check your wiring.
If your cooling system still does not turn on, confirm that you labeled and installed your wires properly.
Did you take a picture of your old thermostat’s wiring? Make sure that you input the correct terminal labels to the wire picker when you installed your thermostat.
Terminal outputs and wiring diagrams (Refer the attached picture on the right side)
Check your configuration
When completing the installation and connection path within the Vine app, your thermostat will be configured automatically based on the wiring that you entered. However, if you do not complete the connection process right away, or if your thermostat is wired incorrectly, it may need to be reconfigured to reflect your system type.
On the thermostat, press the “Menu” button.
Press “Set Up Advanced Setting.”
Select "Heat Type"
Outdoor equipment.
If you have a heat pump, tap “Heat Pump”.
If you have an electric furnace, tap "Electric.”
If you have an gas/oil furnace, tap "Gas/Oil.”
If you have only air conditioner, tap "No heating.”
If you have Heat Pump and Conventional system, tap "Dual Fuel”


If you’ve installed the Vine thermostat and now find that your cooling system is running constantly, proceed through the following steps until the issue is resolved.
First, determine if the issue is with the thermostat.
Set your thermostat Mode to Off and Fan to Auto. When the thermostat is set to Fan On it may sound like the heating or cooling is running even when it isn’t.
If your system still runs after 1-2 minutes, remove the thermostat and check the wiring.
Remove the thermostat face plate from the sub-base. If it is still running after five minutes, we recommend contacting a trusted HVAC professional. There may be a short in the wiring to the equipment.
Check each wire connection on the wall plate, and make sure they’re secure in the terminal blocks.
Make sure the wires are not touching each other. No bare wire should stick out from under screw terminals.
Now test your thermostat.
Working directly on the thermostat – not through the Vine app – set the thermostat to the Cool Mode.
Raise the set point a few degrees above the room temperature.
Within a few seconds, the thermostat should make a soft clicking sound and “Cooling” should disappear from the screen near the set temperature, indicating that your thermostat is operating properly.
If your system is still not turning off, confirm that you labeled and installed your wires properly.
Does your old thermostat have two sets of terminal labels? Learn more here and be sure you’re entering the correct terminals that correspond to your system type (Conventional or Heat Pump). The table below shows what each terminal letter represents.
Then, check that your Vine thermostat is configured correctly for your system type.
If you do not complete the connection process right away, or if your thermostat is wired incorrectly, it may need to be reconfigured to reflect your system type.
On the thermostat, press the Menu button.
Press “Set Up Advanced Setting.”
Select "Heat Type"
Outdoor equipment.
If you have a heat pump, tap “Heat Pump”.
If you have an electric furnace, tap "Electric.”
If you have an gas/oil furnace, tap "Gas/Oil.”
If you have only air conditioner, tap "No heating.”
If you have Heat Pump and Conventional system, tap "Dual Fuel”
Once you’ve selected the choice that best describes your equipment, press “save.”
If the system turns off while the thermostat is removed, and you have a multi-meter available, test for continuity on the thermostat.
Set the multi-meter to Ohms (Ω).
Make sure the face plate is set for Fan AUTO and Mode OFF.
Now test for continuity on the pins on the back of the thermostat face platefrom RC or RH to the terminals corresponding to the device running (G – fan, W/E – furnace, Y – compressor).
NOTE: DO NOT TEST CONTINUITY ON THE THERMOSTAT SUB-BASE TERMINALS OR THE MULTIMETER WILL BE DAMAGED.
For your fan or compressor running constantly, make sure to test between RC and Y and RC and G. Put one test probe on the pin labeled RC and the other test probe on the pin labeled Y.
If continuity is detected when set for Fan AUTO and Mode OFF, replace the thermostat.
If continuity is not detected, the thermostat is operating properly and not calling for the corresponding system component.
If continuity is not detected, and replacing the thermostat face plate makes the system run continuously again, your system may have a Vinetive equipment circuit that is reacting to the power sharing feature in the thermostat. Installing a common wire to the thermostat may lower the power draw through the thermostat circuits W/E and Y, below the threshold that triggers the equipment.

Please take a picture of the wired and send a heat pump with a full-sized furnace
If you’ve just installed the Vine thermostat and now your cooling does not work as expected, proceed through the following steps until the issue is resolved.
Make sure your HVAC equipment power switch is turned on.
Most cooling equipment has a power switch, on or near the furnace or air handler that looks like a light switch. Make sure it is turned on.
Make sure the furnace door or air handler panel is in proper position.
A loose or improperly installed blower compartment door or furnace panel can keep the equipment from operating. Make sure it’s squarely in place so it will engage the safety switch inside the cabinet.
Reset your breaker.
At the main home electrical panel, turn the HVAC equipment breaker off, then turn it back on to reset the breaker.
Test Operation
If your cooling system still does not turn on, follow the steps below to determine if the issue is related to the thermostat.
Working directly on the thermostat – not through the Vine app — set the thermostat to the Cool Mode.
Lower the set point a few degrees below the room temperature.
After 10 seconds, raise the set point above the room temperature by a few degrees.
The thermostat should make a soft clicking sound and mode icon will be changed to with green dot. If this happens, skip the thermostat reset detailed below in step 5.
If the thermostat does NOT click then you should reset the thermostat.
Slightly pull on both sides of the thermostat to remove the face plate from the wall.
After 30 seconds, push the face plate back onto the sub-base. You should hear the face plate snap in place on the sub-base connected to the wall.
Repeat steps 1-4 above after the thermostat has reset.
If the thermostat still does NOT click and “Heating” does not appear on the screen, replace the thermostat.
Tighten the wire connections.
Pull the thermostat off the sub-base and check to make sure the wires are firmly connected to the thermostat terminals.
Pull on each wire. None of them should come out when you tug on them.
Be sure that the thermostat fits securely to the sub-base. If thermostat wiring protrudes too far past the sub-base, or if you did not use the wall screws that were provided, this can prevent your system from turning on.
Check your wiring.
If your cooling system still does not turn on, confirm that you labeled and installed your wires properly.
Did you take a picture of your old thermostat’s wiring? Make sure that you input the correct terminal labels to the wire picker when you installed your thermostat.
Check your configuration
When completing the installation and connection path within the Vine app, your thermostat will be configured automatically based on the wiring that you entered. However, if you do not complete the connection process right away, or if your thermostat is wired incorrectly, it may need to be reconfigured to reflect your system type.
On the thermostat, press the “Menu” button.
Press “Set Up Advanced Setting.”
Select "Heat Type"
Outdoor equipment.
If you have a heat pump, tap “Heat Pump”.
If you have an electric furnace, tap "Electric.”
If you have an gas/oil furnace, tap "Gas/Oil.”
If you have only air conditioner, tap "No heating.”
If you have Heat Pump and Conventional system, tap "Dual Fuel”
Once you’ve selected the choices that best describes your equipment, press “Save.”
It’s important that your Vine thermostat is configured to match your system type. If not, then it may not operate your system as expected. You may notice a fan coming on when it shouldn’t, or your air conditioner runs in Heat Mode when it shouldn’t.
You may also find it unable to switch to Heat Mode or Cool Mode using your thermostat or in the Vine app. The thermostat’s configuration may have accidentally been changed. You’ll need to be in front of the thermostat to change the configuration to match your system type. Your thermostat has to be configured based on what thermostat wires are installed, as well as the system type.
See below for instructions for Vine model.
At the thermostat, tap Menu.
Press “Set Up Advanced Setting.”
Select "Heat Type"
Outdoor equipment.
If you have a heat pump, tap “Heat Pump”.
If you have an electric furnace, tap "Electric.”
If you have an gas/oil furnace, tap "Gas/Oil.”
If you have only air conditioner, tap "No heating.”
If you have Heat Pump and Conventional system, tap "Dual Fuel”
Select 0, 1, 2 on Stage setting screen.
Reversing valve position. This setting is important if you have a heat pump. Leave the default setting to “o.” If you have a heat pump, and you notice that your system is cooling in Heat Mode, and heating in Cool Mode, change from the default setting to “b”.
Tap Save.
A, The conventional system has R/RC, G, Y, W (or W2), C wire in general.
B, If it is lack of G wire, it means the fan function integrates into the conventional system, for example the Heat Type is Electric under some situations.
C, If there are both Rc and Rh in the system, and the wall plate only has R terminal, it should put the Rc and Rh wire together with the R terminal, the wall plate has also Rc and Rh terminal, it should separate connection.
It’s important that your Vine thermostat is configured to match your system type. If not, then it may not operate your system as expected. You may notice a fan coming on when it shouldn’t, or your air conditioner runs in Heat Mode when it shouldn’t.
You may also find it unable to switch to Heat Mode or Cool Mode using your thermostat or in the Vine app. The thermostat’s configuration may have accidentally been changed. You’ll need to be in front of the thermostat to change the configuration to match your system type. Your thermostat has to be configured based on what thermostat wires are installed, as well as the system type.
See below for instructions for Vine model.
At the thermostat, tap Menu.
Press “Set Up Advanced Setting.”
Select "Heat Type"
Outdoor equipment.
If you have a heat pump, tap “Heat Pump”.
If you have an electric furnace, tap "Electric.”
If you have an gas/oil furnace, tap "Gas/Oil.”
If you have only air conditioner, tap "No heating.”
If you have Heat Pump and Conventional system, tap "Dual Fuel”
Select 0, 1, 2 on Stage setting screen.
Reversing valve position. This setting is important if you have a heat pump. Leave the default setting to “o.” If you have a heat pump, and you notice that your system is cooling in Heat Mode, and heating in Cool Mode, change from the default setting to “b”.
Tap Save.
A, The Heat Pump system has R/RC, G, Y, O (or B or O/B), C wire in general,
B, If the system is with Emergence Heat or Auxiliary Heat,
Firstly, the wire (E wire or W) should connect the W terminal
Secondly, choose the heat type. If the device model is TJ919B, it should choose “Heat Pump” and tick the option “AUX/EMG Heat Installed” in the heat type interface.
Thirdly, enable the function. If the device model is TJ225, there is an option Emergency Heat in the mode interface. If the device model is TJ919, there is an option button under the Heat mode icon in the mode interface, it needs to click the button to enable the emergency heat. If not enable the emergency heat, but connect the W wire that means has the auxiliary heat function, it will turn on automatically after the heat keep on working 10 min.
C,Distingue the conventional system and heat pump system based on whether exits O wire or B wire or O/B wire.
D,If the system has O wire or B wire, then the system must be Heat Pump, O wire or B wire connect the O/B terminal, but choose Heat Pump which kind the engaged in valve, it needs to pay attention to distingue that when it has O wire, it should choose engaged in Cool, when it has B wire, it should choose engaged in Heat.
TJ610 series: Menu---->Activation----->enter “HT” or Menu----->Heating & Cooling------>Heat Setup
TJ919B: Menu------>Settings------>Advanced------->Heating Type
TJ225: Menu--------> Settings------>Advanced------->Heat Type
Use the included screws and anchors to mount the new wall plate. Be sure to check for alignment after mounting the wall plate


